Complete Guide to Hardwood Floor Installation Timelines and What Homeowners Should Expect
Thinking about putting in new hardwood floors? One of the first things you might wonder is, "How long will this take?" The quick answer is that the actual installation might only take a few days. But when you factor in ordering, allowing the wood to adjust to your home, prep work, and finishing touches, the whole process can stretch over several weeks. Knowing what to expect can help you plan better and protect your investment.
This guide will walk you through the timeline, key factors that affect scheduling, and what you can expect at each stage. Whether you're considering different types of wood, planning a remodel, or thinking about home upgrades like hardwood flooring or molding installation, understanding the process can make the project feel much more manageable.
For more context, guidance from the National Association of Home Builders and moisture advice from the U.S. Environmental Protection Agency highlight why prep work and indoor conditions are just as important as the flooring itself. A successful installation isn't just about speed; it's about getting each step right.
What the Hardwood Floor Installation Timeline Really Looks Like
Why the “installation day” is only part of the story
Many people think hardwood installation is a one- or two-day project, and that's sometimes true for laying the boards. But the whole timeline often includes consulting, measuring, ordering, delivery, acclimation, demolition, subfloor work, installation, and cleanup. When you add all these steps together, the project can take two to five weeks from start to finish, even though the actual work is much shorter.
This understanding helps avoid frustration. The team might be on site for only a small part of the schedule, but the floor still needs time to adapt to your home's environment. If you're planning floor removal before installing new boards, that can add time depending on the existing material and subfloor condition.
Typical timing by project phase
In a straightforward room with readily available materials, things can move quickly. Measurements and estimates might take a day, ordering a few days, and acclimation at least 48 hours. Installation itself might last one to three days. If sanding, staining, or custom finishing is involved, the project might need extra time for drying and curing before the room is ready.
Exotic wood species, special patterns, or custom finishes can stretch the schedule. Some materials must be ordered weeks in advance, and any moisture issues or uneven subflooring need to be fixed before laying boards. That's why contractors often give a range of time instead of a single date.
Key Factors That Affect How Long Installation Takes
Room size and layout
A big factor is square footage. A small bedroom can be finished faster than an open main floor with hallways, closets, stairs, and transitions. Complex layouts slow things down because installers have to make more cuts and maintain alignment through different spaces. More details mean more precision and time.
Open floor plans can also pose hidden challenges. They may seem easier with fewer walls, but large continuous spaces require careful planning to keep the pattern straight and balanced. Modern, wider planks make layout even more important, as any small errors stand out.
Material type, plank width, and availability
Wood species and style affect both timeline and labor. Wider planks, popular in 2026, give a more expansive look but need extra care during installation. Natural tones and matte finishes are trending because they offer a softer look. These design choices can influence availability and scheduling.
If your chosen material is in stock, the project can move quickly. If you want a special order or imported wood, lead times can stretch to eight to twelve weeks. That's why selecting products early is key, especially if your schedule ties into other work like interior painting or cabinetry updates.
Subfloor condition and moisture levels
Before hardwood can be installed, the subfloor needs to be clean, dry, level, and sound. If installers find squeaks, dips, old adhesive, or water damage, these issues need fixing first. Moisture testing is crucial because wood naturally expands and contracts. Ignoring moisture problems can lead to cupping, buckling, or gaps later on.
The EPA emphasizes controlling indoor humidity to reduce moisture-related problems in homes. If the subfloor or environment is unstable, the installation timeline grows longer, but the result is more durable. Taking an extra day to fix the base can prevent years of repairs later.
Why Acclimation Is One of the Most Important Steps
What acclimation does for hardwood
Acclimation gives the hardwood time to adjust to the temperature and humidity inside your home before installation. This step reduces the chance of boards expanding after they're laid or shrinking once in place. Best practices generally recommend at least 48 hours, though some materials and conditions may require more.
When flooring is delivered from a warehouse or transported across climates, its moisture content may differ from the room where it'll be installed. Letting the wood settle into its new environment before installation improves long-term stability and appearance. It's a simple way to protect the floor from future movement issues.
What homeowners should do during acclimation?
To support the process, keep your HVAC system running at normal conditions and avoid major humidity changes during acclimation. Stack or stage materials so air circulates properly. If you're scheduling drywall repair or other prep work, finish messy tasks before bringing in the wood.
Homeowners sometimes worry that acclimation is just a delay, but it's actually a protective measure. Properly acclimated flooring is less likely to shift or fail after the project ends. In a valuable home improvement project, this isn't wasted time; it's essential time.
Step-by-Step: What Happens During Installation
Day one: prep and layout
On installation day, the crew usually starts by reviewing the space, checking the materials, and confirming the layout plan. They may remove baseboards or trim, protect nearby areas, and prepare tools and adhesives. If old flooring is still there, removal and cleanup can take up a large portion of the first day.
Once the room is ready, installers begin laying out the first rows carefully. The first boards matter a lot because they establish the visual line for the rest of the room. A floor that starts straight tends to stay consistent, while a poor initial layout can create alignment problems.
Day two and beyond: board installation and finishing details
In many projects, the second and third days involve steady installation, trimming boards to fit around obstacles, and securing the floor according to the chosen method. Nail-down and glue-down systems each require specific techniques, and engineered products may install differently from solid hardwood. If your project includes custom patterns or transitions between rooms, those details add precision work.
After the main installation, the crew handles thresholds, trim adjustments, and cleanup. If the flooring is site-finished, sanding, staining, and sealing will require additional drying time. If you need support after installation, related services such as floor repairs can also help correct small issues or address wear over time.
Current Trends Shaping Hardwood Floor Projects in 2026
Wider planks and natural color palettes
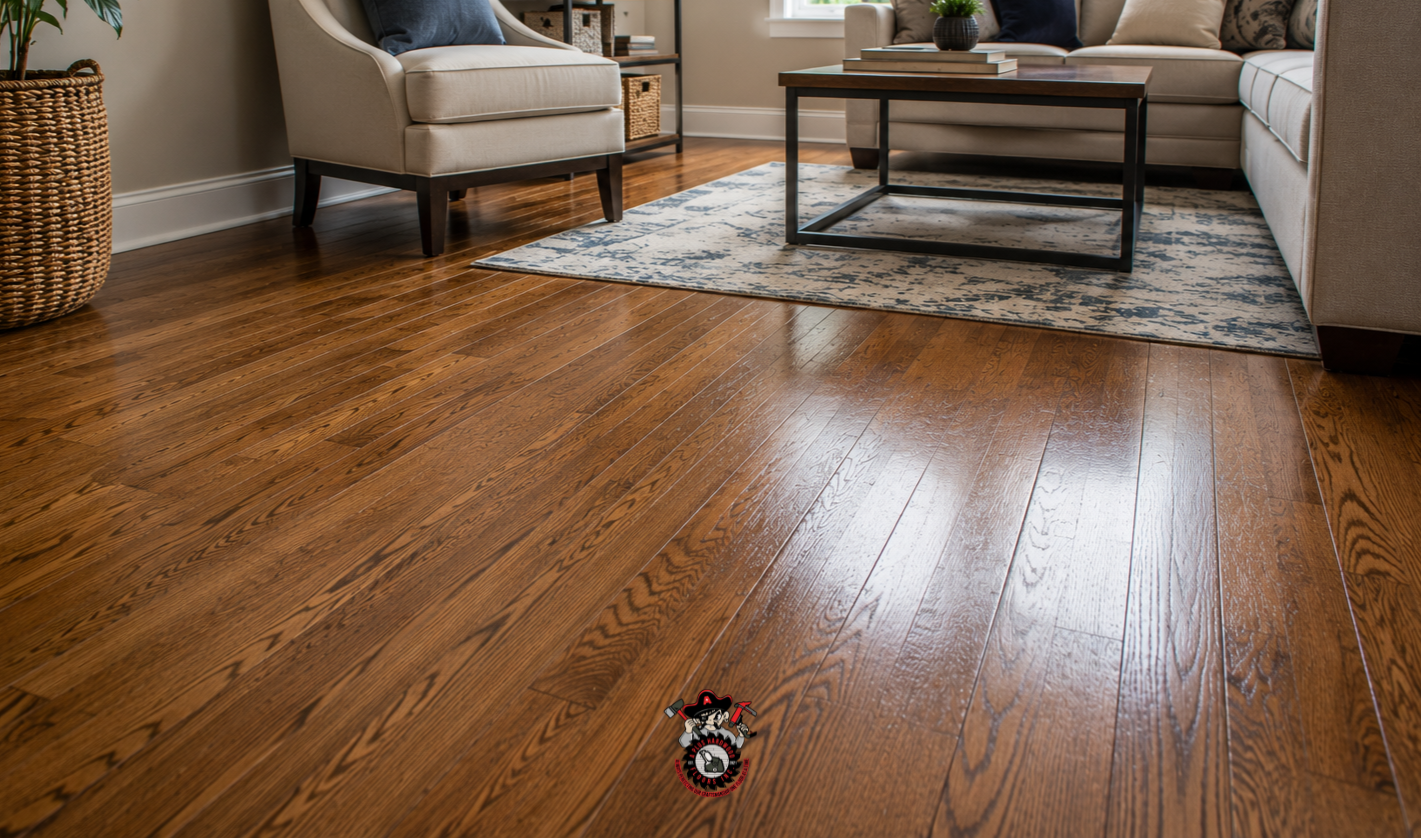
Homeowners in 2026 are leaning toward 7- to 10-inch planks because they create a spacious and updated look. Wider boards reduce the visual busyness that can come with narrow strips, especially in open layouts. At the same time, warm browns, honey hues, and natural oak tones are replacing cooler gray finishes in many homes.
This shift toward warmth reflects a broader desire for interiors that feel welcoming and timeless. It also helps hardwood pair more easily with contemporary furnishings, classic trim, and neutral wall colors. For families who want their flooring to feel current without dating quickly, these tones are a smart long-term choice.
Matte and satin finishes over high gloss.
High-gloss floors can look dramatic, but they often highlight dust, scratches, and small imperfections. Matte and satin finishes have become more popular because they create a softer, more natural look and are better at hiding everyday wear. That practical advantage makes them especially appealing for households with kids, pets, or frequent foot traffic.
Research and product guidance from the World Floor Covering Association also reflect how finish selection affects long-term satisfaction. Choosing a finish is not just a style decision; it is a maintenance decision too. The right finish can make the floor easier to live with for years.
Sustainable and low-waste choices
More homeowners are asking for sustainable flooring options, including responsibly sourced wood and products that support better indoor air quality. While sustainability can influence availability and lead time, it often adds value in the form of durability and peace of mind. If you are comparing material choices, ask your installer how sourcing and product certification affect timing.
Sustainable decisions can also pair well with other home upgrades. For example, choosing durable flooring may reduce the need for future replacements, and a full renovation can be planned around long-term value rather than short-term trends. That is one reason professional advice matters so much at the planning stage.
How Professionals Keep the Project on Schedule
Planning around lead times and crew availability
Experienced flooring contractors build a realistic schedule before the project begins. They confirm material availability, delivery timing, moisture conditions, and labor requirements so the homeowner knows what to expect. This upfront planning is especially useful when the project must coordinate with other work in the home.
If you are renovating multiple spaces, timing matters even more. In some cases, a contractor may recommend completing related upgrades like carpentry or trim work before the flooring goes in, so the new boards are not damaged later. That kind of sequencing can make a project both faster and cleaner.
Managing unexpected issues without derailing the job
Even well-planned projects can uncover surprises, such as hidden subfloor damage or out-of-level areas. A skilled installer will identify the issue early, explain the impact, and adjust the plan before the problem gets worse. While this may extend the timeline slightly, it usually preserves the quality of the finished floor.
That is one of the biggest reasons to hire professionals instead of attempting a rushed do-it-yourself installation. A reputable team can spot moisture concerns, structural problems, or product defects before they become expensive mistakes. The result is a more predictable schedule and a more reliable outcome.
A Real-World Example from a Palatine Home Renovation
Wide-plank white oak with a matte finish
One local homeowner chose wide-plank white oak for a full living and dining area update. The goal was to create a modern look while keeping the home warm and inviting. The homeowner selected a matte finish, which fit the current design trend and also helped the floor feel more natural under changing daylight.
Because the material was ordered in advance, the project stayed on track, but the installers still allowed for acclimation before starting. The actual installation took only a few days, yet the complete process stretched longer because of prep, finishing, and curing time. The homeowner appreciated the extra planning because the final floor looked cohesive, durable, and worth the wait.
Why local expertise matters
Working with a contractor who understands local housing styles and seasonal humidity patterns can improve both design and performance. In areas like Palatine, the right installation approach can help homeowners balance beauty with practical durability. That local knowledge becomes especially valuable when choosing species, finishes, and maintenance expectations.
For homeowners in the area, choosing a team that understands the community can make the experience smoother from start to finish. If you want to explore service options or plan a broader renovation, you can also review related help, such as hardwood floor refinishing, for future maintenance needs.
Common Questions Homeowners Ask Before Installation
How long will I be without access to the room?
That depends on the type of project. A simple installation in one room may only keep the space out of use for a few days, while whole-home projects can affect daily routines for longer. If finishing or curing is required, you may need to avoid heavy traffic for several additional days after the main labor is complete.
It helps to plan around that downtime in advance. Move furniture early, create temporary living arrangements if needed, and ask your contractor exactly when the room will be safe for regular use. Clear communication makes the process much less disruptive.
What if the flooring is damaged during installation?
Reputable contractors should carry insurance and explain their workmanship coverage before the project begins. While damage is not common when professionals handle the work, it is still important to ask about warranties, liability, and how issues are resolved. That conversation protects both your home and your budget.
It is also one reason not to choose a provider based on price alone. The cheapest quote can leave out critical safeguards or proper preparation steps. A high-quality installer delivers more than labor; they deliver accountability.
How do I maintain the floors after installation?
Hardwood maintenance begins as soon as the floor is installed. Use approved cleaning products, avoid excessive water, and place felt pads under furniture to minimize scratching. Regular sweeping or vacuuming helps prevent grit from wearing down the finish.
Over time, periodic refinishing can restore the floor’s beauty and extend its lifespan. If your floor eventually needs a refresh, professional hardwood floor resanding can help remove wear and prepare the surface for a new finish. Long-term care is part of getting full value from your investment.
How to Prepare Your Home for a Smoother Installation
Clear the space and protect nearby areas.
Before the crew arrives, remove furniture, wall décor, and fragile items from the work area. Clear hallways and entry points so installers can move material safely. If dust may spread to nearby rooms, use protective coverings or ask your contractor how they handle containment.
Preparation also includes planning for pets, children, and access routes. A tidy worksite keeps the job moving and reduces the risk of accidental damage. The smoother the prep, the easier it is for the crew to stay focused on precision work.
Coordinate flooring with other home projects.
If your renovation includes painting, drywall, trim, or cabinetry, schedule the messy work first. Flooring is often one of the final major interior steps because it is easier to protect than to replace. That is why homeowners often pair it with other finishing work only after dust-producing projects are complete.
In some homes, the right sequence may even include updates outside the flooring scope, such as pressure washing before exterior improvements or ceiling fan installation during a larger refresh. Planning the order carefully helps each contractor work efficiently and prevents avoidable setbacks.
Final Thoughts: The Best Installation Timelines Are the Ones Built for Quality
So, how long does hardwood floor installation take? In many cases, the physical work is completed in one to three days, but the full project often spans two to five weeks once you include ordering, acclimation, subfloor preparation, and finishing. That timeline is normal, and it is usually a sign that the job is being handled properly rather than rushed.
The smartest approach is to focus on the whole process, not just installation day. When you choose the right product, allow time for acclimation, address subfloor concerns, and hire a professional team, your hardwood floors are far more likely to look beautiful and perform well for years. If you are ready to plan your project, connect with a trusted local expert who can guide you through each step and help you choose the right solution for your space.
For homeowners comparing options, a conversation with A Plus Hardwood Floors Inc. can be the best next step. From new flooring to vinyl flooring, laminate flooring, and maintenance-focused services, the right team can help you turn a long project into a smooth experience. When you are ready to start, ask for a consultation and get a timeline tailored to your home, your materials, and your goals.
Ready to get started? Reach out to A Plus Hardwood Floors Inc. to plan a hardwood flooring project that fits your schedule and delivers lasting results.